Get the answers to the common questions of our users.
Detailed description of each particularity of the Appointment Booking Calendar.
Technical articles with many tips and tricks about the use of Appointment Booking Calendar.
Contact Us if the answer is not in the rest of documentation sources.
Installation Instructions:
Note: The above is a safe process, the plugin's data and settings won't be lost during the process and will appear again after you install the pro version.
Alternative Installation Method:
Upgrade Instructions:
The upgrade instructions are exactly the same instructions mentioned above but be sure to make a backup copy of your current files if you have made custom modifications to the files or translations since the files will be overwritten.
After upgrading the plugin remember to clear your browser's cache.
Use the "Page Break" field on the form builder to indicate the new pages on the form.
The choices of Radio Buttons, and Checkboxes controls, are formed by two input fields, the input field for choice value, and the input field for the text. An IMG tag should be entered in the input field for the choice text, with an absolute URL in the src attribute:
<IMG src="http://..." >
The summary uses two specific class names: cff-summary-title, and cff-summary-value, for the fields labels, and fields values respectively; you only should define both classes in any of css files loaded by your website:
.cff-summary-title{}
.and cff-summary-value{}
These styles will be applied to all summary fields in your form, but what to do if you want to change the styles for only one summary field? The summary field includes two attributes: "Classname for fields titles", and "Classname for fields values", you can enter, through these attributes, the class names you want applied to the labels and values of the fields displayed in a specific summary field, using particular class names for each summary control, allows to show summary fields with different designs.
The form builder does not include a field to insert links explicitly in the form, but you can insert a link through an "Instruct. Text" field. Simply insert an "Instruct. Text" field in the form, and then, enter the tag of the link in any of the field's attributes: "Field Label", or "Instructions for User". For example, to insert a link to our website, you should enter the following tag:
<a href="https://wordpress.dwbooster.com">Visit the website</a>
The controls with access to database are available only in the Developer and Platinum versions of the plugin
This is a step by step about the use of datasource controls
There are different datasources: Database, CSV file, Post Type, Taxonomy, and User Data.
Note: Depending on control selected, all available datasources will be available, or not.
So, suppose we want to populate the field with the data stored in a database table.
Note: If the database is the same as used by WordPress, leave the fields above empty.
Now it's time to define the query to database
If your query is very complex, and you prefer to create it manually; select the option "Custom Query", but in this case you should type all the query. Pay attention because you should use alias in the "SELECT" clause, to indicate the column used to get the values, and the column used to get the texts. For example, a hypothetical query:
SELECT column1 AS value, column2 AS text FROM tablename WHERE column3 > 5 ORDER BY column2 ASC LIMIT 5
To modify the whole styles of the form fields and labels, add the needed styles into the "Customization area >> Add Custom Styles" (at the bottom of the page that contains the list of calendars):
#fbuilder, #fbuilder label,
#fbuilder span { color: #00f; }
#fbuilder input[type=text],
#fbuilder textarea,
#fbuilder select {
border: 2px solid #00f;
}
#fbuilder .pbSubmit { color: #00f; font-weight: bold; }
#fbuilder .section_breaks .section_break { border:0px; }
#fbuilder .section_breaks label { font-size:18px; }
#fbuilder .section_breaks span { font-size:14px; }
#fbuilder .comment_area label { font-size:18px; }
#fbuilder .comment_area span { font-size:14px; }
#fbuilder .pbNext,#fbuilder .pbPrevious {color: #00f;font-weight: bold;}
#fbuilder .fform h1 {font-size:32px;}
#fbuilder .fform span {font-size:16px;}
#fbuilder label .r {color:#f00;}
.uh_phone .l {display:none;}
#fbuilder .dformat {display:none;}
On the other hand to modify only a specific field into the form:
.specialclass label {color: #00f;}
.specialclass input[type=text],
.specialclass textarea,
.specialclass select {border: 2px solid #00f;}
For centering the calendar add these CSS rules into the "Customization area >> Add Custom Styles" (at the bottom of the page that contains the list of calendars):
.appContainer{text-align:center;}
.appContainer2{margin-left:auto;margin-right:auto;width:200px}
After that be sure to refresh the page or clear your browser cache to be sure that the browser is loading the updated CCS styles file.
You can specify the size of the calendar's cells, that way the complete calendar width and height can be controlled.
Add the following style into the "Customization area >> Add Custom Styles" (at the bottom of the page that contains the list of calendars):
#cp_contactformpp_pform .yui-calendar td.calcell, #cp_abcform_pform .yui-calendar td.calcell {
padding-top:10px;
padding-bottom:10px;
border:1px solid #E0E0E0;
text-align:center;
vertical-align: top;
}
Modify the "padding" applied to the cells for getting a different size.
Open the file "wp-content/plugins/appointment-booking-calendar/TDE_AppCalendar/all-css.css" ... find this css rule:
.yui-calendar td.calcell.reserveddate { background-color:#B6EA59; }
...and replace the background color that appears there.
Add these styles into the "Customization area >> Add Custom Styles" (at the bottom of the page that contains the list of calendars):
.cellReserved
{
color:#f00;
background:#ff0;
}
.cell
{
color:#000;
background:#afa
}
...and replace the colors that appears on the above sample style.
Add this style into the "Customization area >> Add Custom Styles" (at the bottom of the page that contains the list of calendars):
#listcal1
{
color:#013F34 !important;
}
...and replace the colors that appears on the above sample style.
Add this CSS rule into the "Customization area >> Add Custom Styles" (at the bottom of the page that contains the list of calendars):
#cp_contactformpp_pform .yui-calendar td.calcell, #cp_abcform_pform .yui-calendar td.calcell {The class names are assigned to the fields through the attribute: "Add Css Layout Keywords". If you need assign multiple class names to a field, you only should enter the class names separated by space characters. For example: myclass1 myclass2
The Up/Down arrows are included by the WebKit browsers (Safari and Chrome ), and Firefox, in the input tags with type="number". To turn off the appearance by default of number fields in WebKit and Firefox browsers you simply should paste the following styles definition in any of CSS files of your website or into the "Customization area >> Add Custom Styles" (at the bottom of the page that contains the list of calendars):
input[type=number]::-webkit-inner-spin-button,
input[type=number]::-webkit-outer-spin-button {
-webkit-appearance: none;
margin: 0;
}
input[type=number]{-moz-appearance: textfield;}
Into the form editor click a field and into its settings there is one field named "Add Css Layout Keywords". Into that field you can put the name of a CSS class that will be applied to the field.
There are some pre-defined CSS classes to use align two, three or four fields into the same line. The CSS classes are named:
For example if you want to put two fields into the same line then specify for both fields the class name "column2".
There is another way to display multiple fields in a row. Insert a container field in the form: DIV or FIELDSET, and select the number of columns through the attribute: "Columns". In this case all fields inserted into the container are displayed distributed in columns.
But, what happen if you want create 6, 8, 12 or 14 columns? The answer is simple, use the container controls ( the DIV field ). If you want create 6 columns, a way to do it would be insert two DIV container, and assign to each of them the class name: column2, finally you should insert three fields in each of containers and assign to all of them the class name column3. You will have inserted 6 columns. Following this method you can create as many columns as you want.
You should use a custom class name. All fields include the attribute "Add Css Layout Keywords", you only should enter through this attribute a custom class name (the class name you prefer), for example myclass, and then define the new class in a css file of your website or into the "Customization area >> Add Custom Styles" (at the bottom of the page that contains the list of calendars), like follow:
.myclass{ display:none; }
If you are using the latest version of the plugin, please enter in the "Add Css Layout Keywords" attribute, the class name: hide, included in the plugin's distribution.
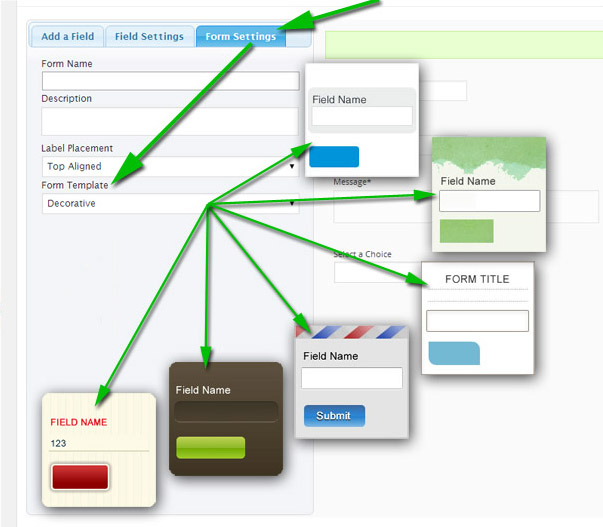
If you have enabled the form builder (pro version), into the form builder in the administration area, click the "Form Settings" tab. That area is for editing the form title and header text.
It can be used also for different alignment of the field labels.
The Developer and Platinum versions of the plugin include multiple templates that can be assigned to the Forms to display a predefined design: Default template, Letter template, Professional, Natural, Elegant, Decorative and Clean Design.
Each template is stored in its own directory, in the "templates" folder ( "/wp-content/plugins/appointment-booking-calendar/templates"). Basically the templates are formed by a CSS file ( style.css ). If you want change the appearance of a predefined template, you simply should modify the style.css file corresponding to the template. The directories of each template are:
To hide the "### ### ####" add this CSS rule into the "Customization area >> Add Custom Styles" (at the bottom of the page that contains the list of calendars):
.uh_phone .l{display:none}
In addition to the possibility of editing the email contents you can use the following tags:
There is a tag named <%INFORMATION%> that is replaced with all the information posted from the form, however you can use also optional tags for specific fields into the form.
Use the tag %ITEMNUMBER% into the email content. That tag will be replaced by the PayPal item number.
The uploaded file is attached to the email and in addition to that you can include a link to it by adding a specific field tag into the email message.
In the form builder select/click the upload field for that field, there is a read-only setting named "Field tag for the message (optional):" that shows the field tag for the "uploaded file name", for example: <%fieldname7%>. If that is the tag for your file field then copy and paste that tag into the email message, adding the postfix _url, example: <%fieldname7_url%>.
If you want send an image in the notification emails, like a header, you should insert an IMG tag in the "Email notification to admin" and/or "Email confirmation to user" textareas of form settings, with an absolute URL in the SRC attribute of IMG tag:
<IMG src="http://..." >
If you are using the HTML format in the notification emails, you should insert the BR tags for the changes of lines in the emails content:
<BR />
To hide the cost add this style into the "Customization area >> Add Custom Styles" (at the bottom of the page that contains the list of calendars):
#abccost { display: none }
For styles modifications add a rule like this one into the "Customization area >> Add Custom Styles" (at the bottom of the page that contains the list of calendars)(sample changing the color and font size):
#abccost { color: #ff0000; font-size: 16px; }
To display the capacity still available on each slot (valid for commercial versions of the plugin) you can add the following CSS style into the "Customization area >> Add Custom Styles" (at the bottom of the page that contains the list of calendars):
.cpabc_capacity{display:block !important;}
First, you should activate the WooCommerce Addon in the settings page of the plugin: "Settings/Appointment Booking Calendar".
Go to the settings page of the plugin tick the choice "WooCommerce", and press the "Activate/Deactivate Addons" button.
Second, create the form as usual, including the price settings if needed.
Third, After create the form, is time to edit the product in WooCommerce. The addon has included a new section in the product's settings (the section: "Appointment Booking Calendar"), that allows:
1. Associate the form with the product, enter the form ID through the "Enter the ID of the form" attribute. The form's id is the number in front to the form, in the list of forms on the settings page of the plugin.
2. If you want get the final price of product through the form, check the option: "Calculate the product price through the form".
3. Define a minimum price for products, to avoid selling the products to a lower price than allowed.
Finally, be sure the product in WooCommerce has defined a "Regular price", because in other case, WooCommerce won't display the "Add to cart" button in the public page
The Metabox in the products page includes a section to define the summary to display in the shopping cart.
You simply should: active the summary, enter a title for the summary, and defines the summary, it is possible to use all special tags supported in the notification emails, and the thank you page.
The developer version of the plugin includes the Webhook addon that allows integrate the forms with the Zapier service. The Zapier service connects two apps (the trigger apps with the action apps).
To export the submitted files to Dropbox follow the steps below:
Each time a file is uploaded through your form, the file is uploaded to the Dropbox account too.
The developer version of the plugin includes the Webhook addon that allows integrate the forms with the Zapier service. The Zapier service connects two apps (the trigger apps with the action apps).
To generate a PDF file with the information submitted through a form, and send an email with the file attached, to the email address entered by the user, it is possible using the WebMerge app in Zapier.
The WebMerge service allows upload an fillable PDF file, or a file of Microsoft Word, Excel, or Power Point, to be used as template, or generate a online document, and merge these files with the information received from the website (in this case, from Zapier).
The WebMerge service allows define many destinations for the merged file, one of them is send the file generated as attachment to the email address entered by the user (there are many other possible destinations)
Simply follow the process below:
That's all, each time the form is submitted, a new PDF file is generated in the WebMerge service, and sent as attachment to the user email.
Zapier is a service that allows to connect two apps. You should use webhook as the trigger app, and activate the addon in the developer version of the plugin for sharing the submitted information with another apps, like: DropBox, Google Drive, etc.
Is possible connecting a file field with multiple selection, with another apps like DropBox? The answer is yes.
For each file field, the plugin shares the variable fieldname#_urls, through the webhook. The new variable include URLs of files, uploaded from the fieldname# field, separated by the comma symbol. If the new variable is selected through Zapier, Zapier is able to share the files with the action app.
If the form doesn't appear in the public website (in some cases only the captcha appear) then change the script load method to direct, this is the solution in most cases.
That can be changed in the "troubleshoot area" located below the list of calendars/items.
Please check if after receiving the payment at Paypal the appointment appears registered in the calendar (some time slot unavailable) or if it appears in the bookings list:
In the "throubleshoot area" (located below the list of forms in the settings area) change the "Script load method" from "Classic" to "Direct".
Use the "throubleshoot area" to change the character encoding. If you want to do that manually then please change the encoding of the database table "wp_cpabc_appointment_calendars" to utf-8. You can do that from the PHPMyAdmin or the tool that you are using to access the database. After changing the encoding, edit again the calculator form to re-enter the characters that aren't being correctly displayed.
The free version must be deleted before installing the pro version.
If you are upgrading the pro version to a new version you should also remove the previously installed version.
This is a safe step, the plugin's data and settings won't be lost during the process.
Another alternative is to overwrite the plugin files through a FTP connection. This is also a safe step.
Yes, both plugins are compatible, but you should configure the plugins, following the steps below:
Yes, both plugins are compatible, but you should configure the plugins if the option "Load JavaScript defered" in WP Rocket is enabled.
The option "Load JavaScript defered" breaks some scripts in the plugin, so in that case the options are to disable the option "Load JavaScript defered" or to exclude the page that contains the plugin form from the WP Rocket Cache.
For info about excluding pages from the WP Rocket cache you can check the following page:
https://docs.wp-rocket.me/article/54-exclude-pages-from-the-cache
The Developer Version has an optional feature for automatically converting the time-slots to the user timezone. It can be configured in the following settings field:
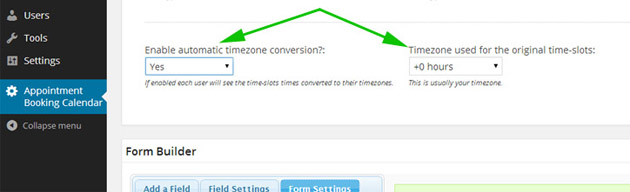 Screenshot: Automatic time zone conversion settings in the Developer version.
You can test it from a computer with other timezone or by changing the timezone of your own computer.
If you are using a webkit based browser for the test (Safari or Google Chrome) note that you have to restart the browser in order to get the updated timezone, otherwise it will keep cached the initial timezone set when the page was opened.
The following shortcodes are available in the Developer Version for showing the current user bookings and a read-only calendar:
[CPABC_APPOINTMENT_CALENDAR_CURRENT_USER_BOOKINGS]: Supports the same parameters used for the calendar lists.
[CPABC_APPOINTMENT_CALENDAR_READ_ONLY]: Supports the same parameters than the booking calendar shortcode (ex: the calendar ID).
In the Developer version is possible to have the confirmation emails to include an iCal (.ics) attachment so can be accepted straight into Outlook / Google calendar, etc..
To enable that option (only in the Developer version) go to the calendar settings, to the section "iCal file for emails" (between the "Reminder Settings" and "Custom Settings" sections), mark the checkbox "Send iCal file via email?" and in the "iCal subject line" enter the following:
Appointment - <%name%>
The title/subject line can be customized with any field from the form builder. Check the field tag in the form builder and paste it into the title line.
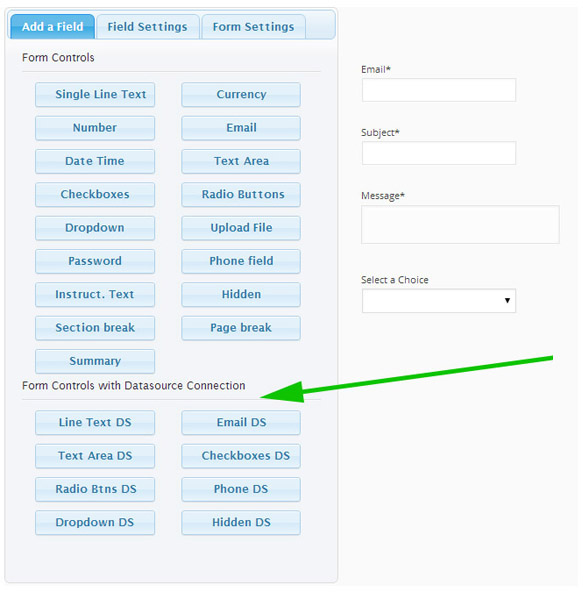
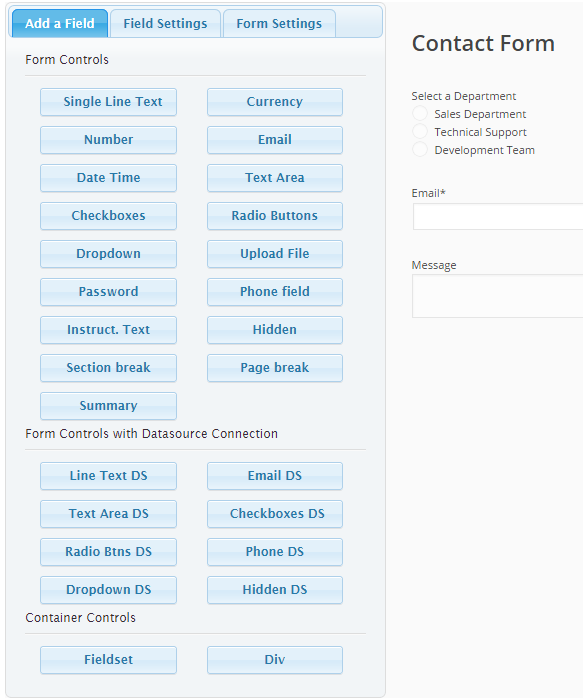
The form builder of the Developer and Platinum Versions has the following additional fields in the form builder:
The Developer and Platinum Versions has the following additional pre-built styles for the form fields:
The following additional field types are available in the Developer and Platinum Versions:
The Platinum Version has an optional feature for automatically create and assign a calendar for new users using one of the existent calendars as source to duplicate its settings. This way everytime a new user is created, a calendar is also automatically created and assigned to the new user.
The Platinum Version has an optional feature for automatically sharing the availability between different calendars.
This way one of the calendars will be used as source to define the available slots and once the slots are booked in one of the calendars will appear booked also in all the calendars of its group. This feature is useful if different calendars are used for different services and you want to keep the availability shared between the calendars.
The Platinum Version has an optional feature to add a cancellation link into the emails with some configurable options.
To add the cancellation link into an email add the following tag into the email content: %CANCEL%, this tag will be replaced with the cancellation link.
The Platinum version also supports the tag %ALL_CANCEL_LINKS%, that will be replaced with a separated cancellation link for each one of the selected slots.
In the Platinum Version you can visually configure the following parameters for the cancellation link:
The Platinum Version, in addition to the iCal export link, has an additional add-on to automatically import bookings from external calendars supporting iCal, like for example Google Calendar, Outlook Calendar, iCloud/Apple calendars, etc...
The iCal link in the calendars list can be used to setup the automatic export to the third party calendar and the iCal automatic import add-on can be used to automatically import the bookings form the external calendar, this way you have a full two-way calendar synchronization.
The Platinum version of the Appointment Booking Calendar supports double opt-in e-mail validation. The double opt-in process includes two steps. In step 1, a potential customer fills out and submits your online booking form. In step 2, they'll receive a confirmation email and click a link to verify their email, changing the status of the booking to "confirmed".
The double opt-in e-mail validation is useful to comply the European General Data Protection Regulation (GDPR).
The double opt-in e-mail validation can be activated under the Troubleshoot Area & General Settings located at the bottom of the page that contains the list of calendars.
You can read more about this feature in the Double-Opt-In E-mail Validation documentation.
The Platinum version of the Appointment Booking Calendar has shortcodes to allow the users to check their bookings.
If the user has an account into the website, was logged in when submitted the appointment and is already logged in, then the following shortcode will display their bookings:
[CPABC_APPOINTMENT_CALENDAR_CURRENT_USER_BOOKINGS]
The above shortcode supports the same parameters supported by the shortcode [CPABC_APPOINTMENT_LIST] and also the following additional parameter:
- displaycancel: Displays a cancellation link for the bookings with cancellation allowed. Sample use [CPABC_APPOINTMENT_CALENDAR_CURRENT_USER_BOOKINGS displaycancel="true"]
For more info about the parameters to customize these shortcodes see the FAQ entry related to the lists shortcodes.
In the case the users don't have an account in the website then the shortcode you can use to allow the users check their booked appointments (with cancellation options) is the following:
[CPABC_APPOINTMENT_MYAPPS calendar="1" fields="DATE,TIME,fieldname1" emailfield="email" namefield="fieldname1"]
The first parameter is the calendar ID. The ID of the fields (fieldname1, fieldname2, ...) have to be adjusted to match the IDs of the fields on your form.
The result of that shortcode will be a login form where the customer can log in entered the values of two fields submitted in their appointment (usually email and firstname or lastname or email and phone number). The user will have access to cancel the booking or re-schedule it to a different available time.
The Platinum version of the Appointment Booking Calendar has a shortcode to allow the edition of the calendar settings in the frontend. This way you can grant some user the permissions to edit the calendar availability without having to grant them access to the dashboard area.
Shortcode for editing the calendar assigned to the user currently logged in:
[CPABC_EDIT_CALENDAR]
Shortcode for editing a specific calendar (adding the calendar ID):
[CPABC_EDIT_CALENDAR calendar="1"]
The default shortcode will display only the edition of the availability (available dates and hours), but the following attribute can be added to grant access to edit the whole settings including emails, cost, payment settings:
[CPABC_EDIT_CALENDAR fullsettings="1"]
The Platinum version of the Appointment Booking Calendar has a feature for adding the booking data into the confirmatino page (the page where the user is redirected after the booking).
The feature can be used as described in the following image (click to enlarge):
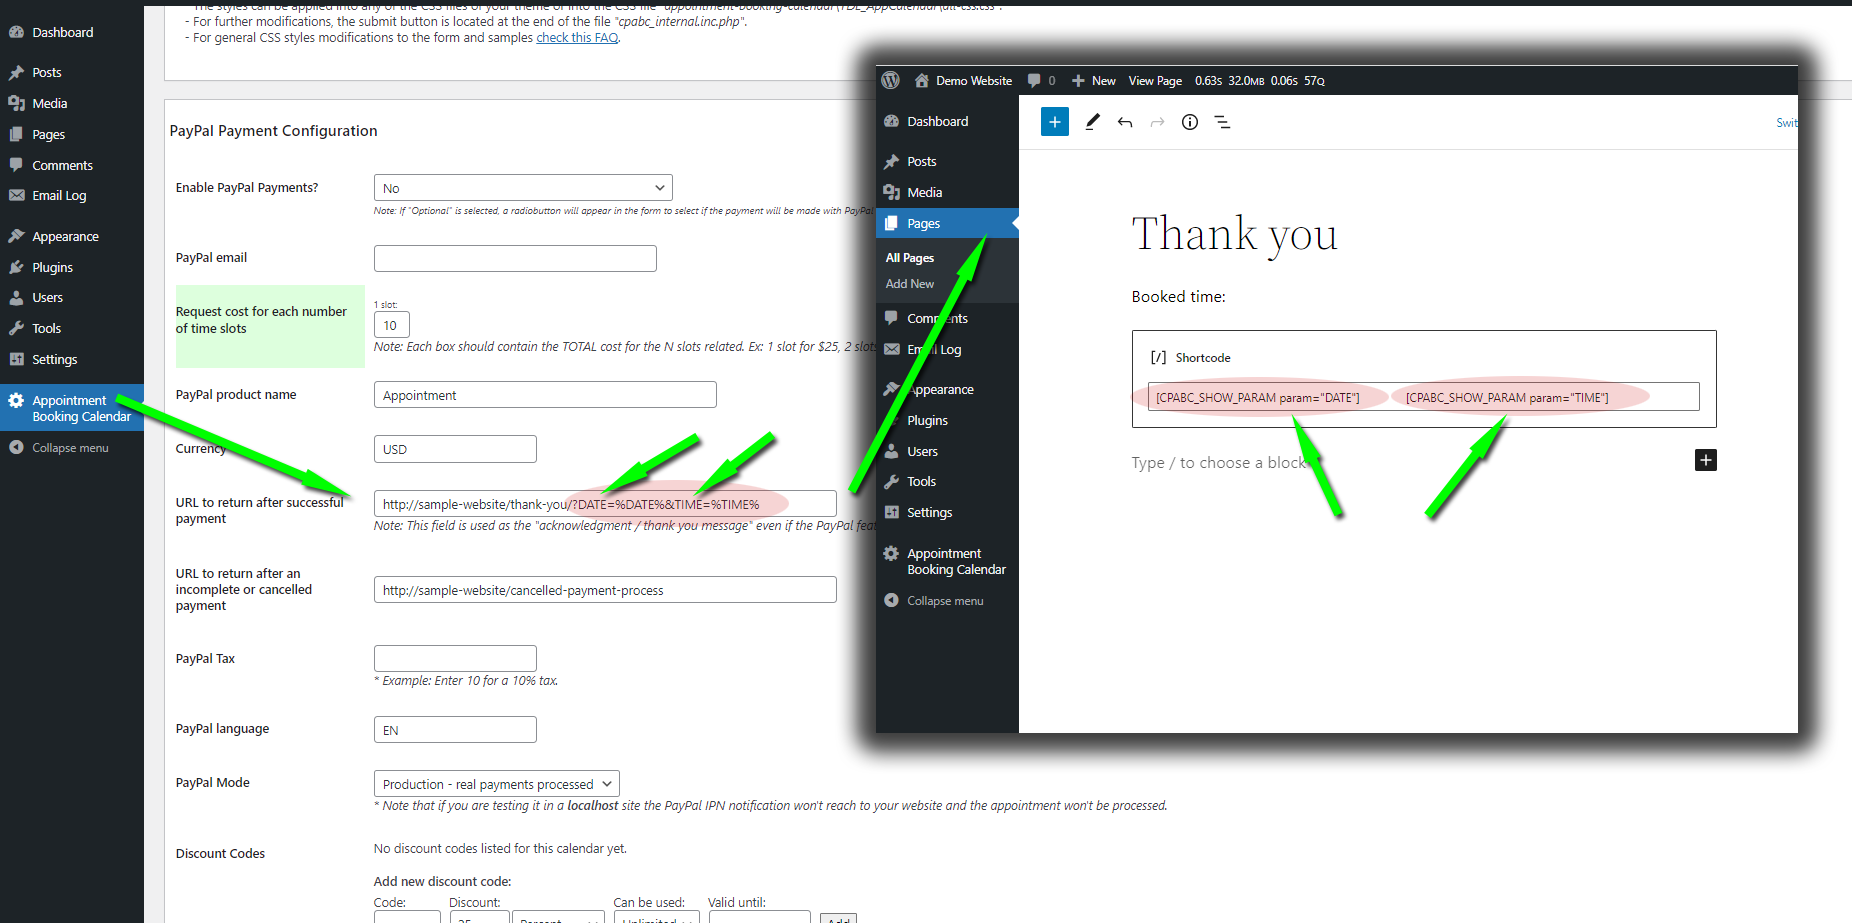
Remember that the "acknowledgment / thank you message" shown to the user after submitting the form should be placed at the page indicated in the field "URL to return after successful payment". Note that after the submission the user is redirected to that page even if the Paypal feature isn't used.
Please read the instructions on this Google page:
https://support.google.com/calendar/answer/37100?hl=en
To get the iCal feed URL right click the "iCal" link on the calendar list and click "Copy Link Address" or "Copy Link Location" (depending of the browser you are using).
Note: This will automatically export the bookings stored in the plugin to the Google Calendar.
The inverse process (import the items from Google Calendar or from other external calendar into the plugin) is available only in the Platinum version of the plugin through the iCal Automatic Import add-on.
For more detailed instructions check the following page: Adding the appointments to Google Calendar and iPhone/ iPad Calendars / Outlook Calendars
The reminder sent "X hours BEFORE the booking" is sent approximately "X hours" before the start date of the booking (first hour of the day) using the server time. The first hour of the day (midnight) is used as reference for both "partial days" and "complete days" mode.
Some website activity is needed to lauch the pending reminders notification, so if the website has a very low number of visits a cron should be set to load the website homepage at least once every hour (not needed in most cases).
This FAQ entry explains a solution to block all the time slots into a day after the first slot booked on that day. Sample case of use: If you can attend only one customer per day but you want to allow selecting the time from a set of available times.
The following solution requires the form builder available in the commercial versions of the plugin:
The first step is to enable the form builder in the "troubleshoot area" located below the list of calendars and after that a visual form builder will appear on each calendar settings page to visually add/modify fields and set the validation rules.
The second step is to add at least one restricted date in the calendar. It can be a date in the past, the purpose of this step is just to create the needed structure for blocking new dates.
The final step is to add a small piece of script with the option "Add Custom JavaScript" located at the bottom of the page that contains the list of calendars. Click here to copy the piece of script that needs to be added.
A list with the appointments set on the calendar can be displayed by using this shortcode in the page where you want to display the list:
[CPABC_APPOINTMENT_LIST]... it can be also customized with some parameters if needed, example:
[CPABC_APPOINTMENT_LIST from="today" to="today +30 days" fields="DATE,TIME,NAME" calendar="1"]... the "from" and "to" are used to display only the appointments / bookings on the specified period. That can be either indicated as relative days to "today" or as fixed dates.
There is also a "group" attribute to join the names of the appointments made on the same time-slot (for time-slots with multiple capacity):
[CPABC_APPOINTMENT_LIST group="yes"]The "fields" can be used to modify the columns to display, that field accepts the following items (uppercase):
- CALENDAR
- DATE
- TIME
- NAME
- PHONE
- COMMENTS
... however, in most cases, probably you don't want to display the phone or comments.
The styles for the list are located at the end of the file "all-css.css":
.cpabc_field_0, .cpabc_field_1, .cpabc_field_2, ...
Clear the browser cache if the list isn't displayed in a correct way (to be sure it loads the updated styles).
Additional filters for the Platinum version of the plugin:
The platinum version supports also the following filters for the shortcode:
- orderby: Sets the list order. Sample use [CPABC_APPOINTMENT_LIST orderby="datatime ASC"]
- query: Query for specific data. Sample use [CPABC_APPOINTMENT_LIST query="sample search keyword"]
- displayslots: Displays also non-booked (available) slots in the list. Sample use [CPABC_APPOINTMENT_LIST displayslots="yes"]
Shortcode to display the current user bookings (WordPress user logged in):
[CPABC_APPOINTMENT_CALENDAR_CURRENT_USER_BOOKINGS]
The above shortcode supports the same parameters supported by the shortcode [CPABC_APPOINTMENT_LIST] and also the following additional parameter:
- displaycancel: Displays a cancellation link for the bookings with cancellation allowed. Sample use [CPABC_APPOINTMENT_CALENDAR_CURRENT_USER_BOOKINGS displaycancel="true"]
Shortcode to display the bookings for the calendar own by the current user (bookings for the calendar assigned to the WordPress user logged in):
[CPABC_APPOINTMENT_CALENDAR_MY_CAL_BOOKINGS]
Shortcode to display the list with a search filter at the top (supports the same attributes/parameters that other list shortocodes):
[CPABC_APPOINTMENT_LIST_QUERY]
The way for publishing various calendars into the same page is to assign the calendars to the same user (ex: admin) and then use a shortcode like this one:
[CPABC_APPOINTMENT_CALENDAR user="admin"]
... that way a drop-down select field will appear above the calendar allowing to select the calendars assigned to the user indicated in the shortcode.